고정 헤더 영역
상세 컨텐츠
본문
Introduction
In the last lesson, we saw that a convolutional classifier has two parts: a convolutional base and a head of dense layers. We learned that the job of the base is to extract visual features from an image, which the head would then use to classify the image.
지난 강의에서 우리는 convnet이 합성곱으로 된 베이스와 덴스 레이어의 헤드로 이루어졌다는 것을 말했다. 우리는 베이스가 이미지로 부터 피쳐를 뽑ㅇ라내고 헤드가 이것을 이용한 분류작업으로 이미지를 분류한다는 걸 배웠다.
Over the next few lessons, we're going to learn about the two most important types of layers that you'll usually find in the base of a convolutional image classifier. These are the convolutional layer with ReLU activation, and the maximum pooling layer. In Lesson 5, you'll learn how to design your own convnet by composing these layers into blocks that perform the feature extraction.
이제 Convolutional classifier에서 다루는 중요한 레이어 2가지를 배우게 될 것이다.
Relu 활성화 함수를 포함하는 합성곱 레이어와 맥시멈 풀링(Maximum pooling)가 그것이다.
레슨5에서는 베이스에 이 두가지 레이어를 어떻게 넣어서 자기만의 콘브이넷을 다루는 지 알아볼 것이다.
This lesson is about the convolutional layer with its ReLU activation function.
여기서는 우선 ReLU 활성화 함수를 포함하는 레이어에 대해서 알아보자.
Feature Extraction
피쳐 추출
Before we get into the details of convolution, let's discuss the purpose of these layers in the network. We're going to see how these three operations (convolution, ReLU, and maximum pooling) are used to implement the feature extraction process.
합성곱 레이어의 디테일을 확인하기 전에 신경망에서 이 레이어가 가진 역할이 무엇인지 먼저 살펴보자.
(앞으로 3가지 기능 Convolution합성곱, ReLU 활성화, 그리고 맥시멈풀링의 단계를 각각 배우게 될 것이다.)
The feature extraction performed by the base consists of three basic operations:
베이스에서 피쳐 추출은 다음의 기본적 3가지 작동에 의해 이루어진다.
1.
Filter an image for a particular feature (convolution)
이미지를 특정 기준(Particular feature)으로 필터링 한다. -> Convolution
2.
Detect that feature within the filtered image (ReLU)
필터링된 이미지에서 피쳐를 감지한다. (ReLU)
3.
Condense the image to enhance the features (maximum pooling)
이미지를 컨덴싱(응축, 압축) 하여 피쳐를 확장한다.(맥시멈 풀링 - 무슨 의미인지는 나중에 보완하자.)
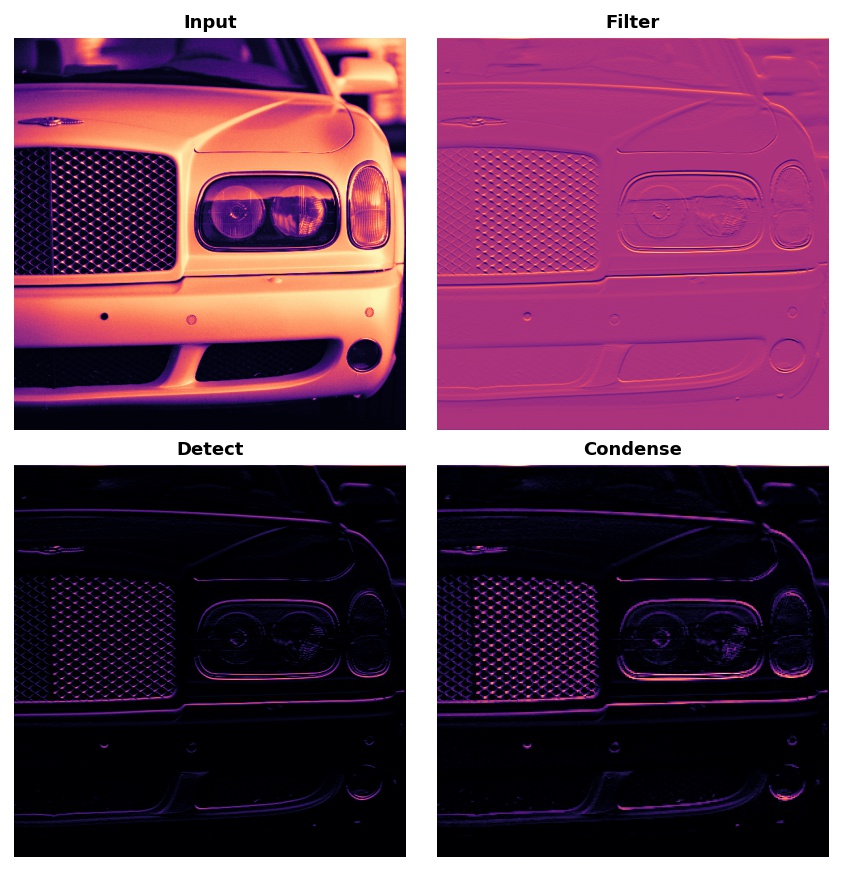
The next figure illustrates this process. You can see how these three operations are able to isolate some particular characteristic of the original image (in this case, horizontal lines).
아래 그림은 이러한 프로세스를 도식화한것이다.
여기서 우리는 원 이미지로 부터 어떻게 특징적인 피쳐(여기서는 수평선)를 고립시키고 활용할 수 있는지 볼 수 있다.
Typically, the network will perform several extractions in parallel on a single image. In modern convnets, it's not uncommon for the final layer in the base to be producing over 1000 unique visual features.
보통 하나의 이미지에 대해 동시에 여러개의 Feature 추출을 실시한다. 최신의 컨브이넷에서는 최소 1000개이상의 피쳐를 뽑아낸다.
Filter with Convolution
합성곱필터
A convolutional layer carries out the filtering step. You might define a convolutional layer in a Keras model something like this:
합성곱레이어는 필터링 스텝을 진행한다.
케라스에서는 아래 코드와 같이 정의한다.
#파이썬코드
from tensorflow import keras
from tensorflow.keras import layers
model = keras.Sequential([
layers.Conv2D(filters=64, kernel_size=3), # activation is None
# More layers follow
])
We can understand these parameters by looking at their relationship to the weights and activations of the layer. Let's do that now.
이 파라미터들, 그리고 해당 레이어의 활성화함수와 가중치간의 관계를 살펴보면 이 파라미터들이 하는 일이 짐작할 수 있다.
Weights
가중치
The weights a convnet learns during training are primarily contained in its convolutional layers. These weights we call kernels. We can represent them as small arrays:
컨브이넷에서 학습하는 가중치의 대부분은 이 합성곱 레이어에 대한 것이다. 이 가중치들을 우리는 커널이라고 부르며, 작은 어레이(array)로 구성되어 있다.
A 3x3 kernel.
A kernel operates by scanning over an image and producing a weighted sum of pixel values. In this way, a kernel will act sort of like a polarized lens, emphasizing or deemphasizing certain patterns of information.
이미지를 스캐닝하고 픽셀값에 대한 합산치에 대해 가중치를 더해서 커널은 작동된다.
커널은 일종의 편광렌즈처럼 작동되며 정보의 특정 부분을 강조하거나 강조되지 않도록 조정한다.
Kernels define how a convolutional layer is connected to the layer that follows. The kernel above will connect each neuron in the output to nine neurons in the input. By setting the dimensions of the kernels with kernel_size, you are telling the convnet how to form these connections. Most often, a kernel will have odd-numbered dimensions -- like kernel_size=(3, 3) or (5, 5) -- so that a single pixel sits at the center, but this is not a requirement.
커널은 합성곱레이어가 어떻게 다른 레이어와 연결되는지를 정의한다. 커널은 인풋 쪽의 아홉개 뉴런을 아웃풋 뉴런에 연결한다. kernel_size의 차원 세팅을 통해 정해진다.
대부분의 경우 kernel_size는 홀수로 채워진다.
(3.3), (5,5)
The kernels in a convolutional layer determine what kinds of features it creates. During training, a convnet tries to learn what features it needs to solve the classification problem. This means finding the best values for its kernels.
합성곱레이어에 속한 커널은 어떤 종류의 피쳐가 생성될 것인가를 결정하고 트레이닝 도중 컨브이넷은 분류문제를 풀기 위해 필요한 피쳐에 대해서 학습을 한다. 자체 커널을 위해 최선으값을 찾게 된다.
Activations
활성화함수
The activations in the network we call feature maps. They are what result when we apply a filter to an image; they contain the visual features the kernel extracts. Here are a few kernels pictured with feature maps they produced.
신경 네트워크에서 활성화를 우리는 피쳐맵을 짠다고 한다. 다음은 몇가지 사례다
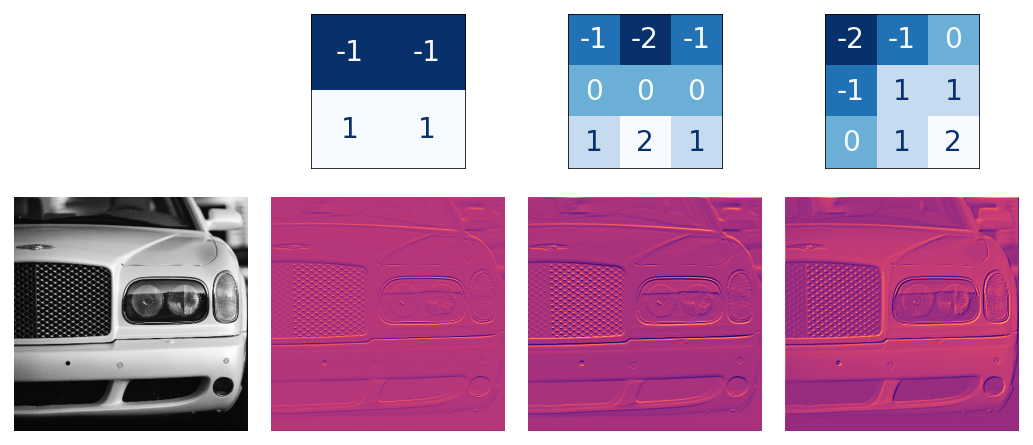
Three kernels and the feature maps they produce.
Kernels and features.
From the pattern of numbers in the kernel, you can tell the kinds of feature maps it creates.
Generally, what a convolution accentuates in its inputs will match the shape of the positive numbers in the kernel. The left and middle kernels above will both filter for horizontal shapes.
커널에 있는 숫자 패턴으로부터 어떤 피쳐맵이 생성되는지 알 수 있는데, 위의 그림에서 왼쪽과 가운데 커널은 모두 horizontal shape에 대한 필터다.
#그러나 나는 잘 모르겠다. 뭔소린지. 일단 넘어간다.
With the filters parameter, you tell the convolutional layer how many feature maps you want it to create as output.
필터 파라미터로 합성곱레이어가 몇개의 피쳐맵을 생성할지 정한다.
Detect with ReLU
ReLU를 이용한 감지
After filtering, the feature maps pass through the activation function. The rectifier function has a graph like this:
필터링이후 활성화함수를 거치기전 거쳐야 하는 함수. rectifier function의 그래프는 다음과 같다.
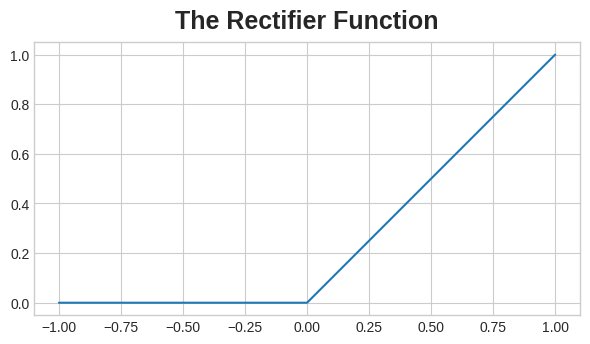
The graph of the rectifier function looks like a line with the negative part "rectified" to
0.
교정함수 그래프를 보면 x축의 마이너스 영역에서 함수값을 0으로 교정하고 있다.
#rectify는 put right, 바로 잡다, 교정하다의 의미다.
#rectified는 교정된으로 볼 수도 있지만, 전기공학에서 rectifier라는 단어가 정류(교류를 직류로 전환하는데 마이너스값을 없애거나 플러스로 교정함.)의 의미를 가지고 있다보니 수많은 사람들이 rectifier function을 정류 함수로 번역함. 그러나 정류라는 말 자체가 전기 공학에 한정되는 말.
A neuron with a rectifier attached is called a rectified linear unit. For that reason, we might also call the rectifier function the ReLU activation or even the ReLU function.
뉴런에 이 교정기(rectifier)를 붙이면 Rectified Linear Unit (RLU; 선형교정유닛) --> 우리는 이미 ReLU 활성화 함수에 대해서 다뤘다.
The ReLU activation can be defined in its own Activation layer, but most often you'll just include it as the activation function of Conv2D.
ReLU 활성화는 자체의 활성화 레이어에서 정의될 수 있으나 보통은 Conv2D의 활성화 함수 안에 파라미터로 포함시킨다.
#파이썬코드
model = keras.Sequential([
layers.Conv2D(filters=64, kernel_size=3, activation='relu')
# More layers follow
])
You could think about the activation function as scoring pixel values according to some measure of importance. The ReLU activation says that negative values are not important and so sets them to 0. ("Everything unimportant is equally unimportant.")
활성화 함수는 어떤 기준에 의해서 이미지 픽셀에 대한 값을 매기게 되고 ReLU에 의해서 마이너스 값은 0으로 교정된다. (즉 마이너스값은 일괄 0으로 교정하여 무시.)
Here is ReLU applied the feature maps above. Notice how it succeeds at isolating the features.
ReLU 는 위의 피쳐맵에 적용되고 있고, 얼마나 피쳐를 잘 고립시키는지 보자.

Like other activation functions, the ReLU function is nonlinear. Essentially this means that the total effect of all the layers in the network becomes different than what you would get by just adding the effects together -- which would be the same as what you could achieve with only a single layer. The nonlinearity ensures features will combine in interesting ways as they move deeper into the network. (We'll explore this "feature compounding" more in Lesson 5.)
다른 활성화 함수들 처럼 ReLU 함수는 비선형 함수이다.(간단히 설명하자면 레이어의 개별적인 효과를 기대하고 그것을 모두 다 더한것과 한번에 모든 레이어를 적용한 결과값이 다를 수 있다.)
이러한 비선형성은 각 피쳐들이 신경망 깊숙히 연관되면서 알수 없는 방법으로 조합될 수 있다.
예시) CONVNET과 ReLU 적용.
Example - Apply Convolution and ReLU
We'll do the extraction ourselves in this example to understand better what convolutional networks are doing "behind the scenes".
신경망 내부에서 합성곱 네트워크의 목적과 역할이 무엇인지 알기 위해 아래 예시를 실시해 보자.
#파이썬코드
import tensorflow as tf
import matplotlib.pyplot as plt
#아래는 선언된 그래프 그리는 객체; 플로팅 객체에 대해 미리 세팅하는 것.
plt.rc('figure', autolayout=True)
plt.rc('axes', labelweight='bold', labelsize='large',
titleweight='bold', titlesize=18, titlepad=10)
plt.rc('image', cmap='magma')
#모델에 인풋할 이미지 위치
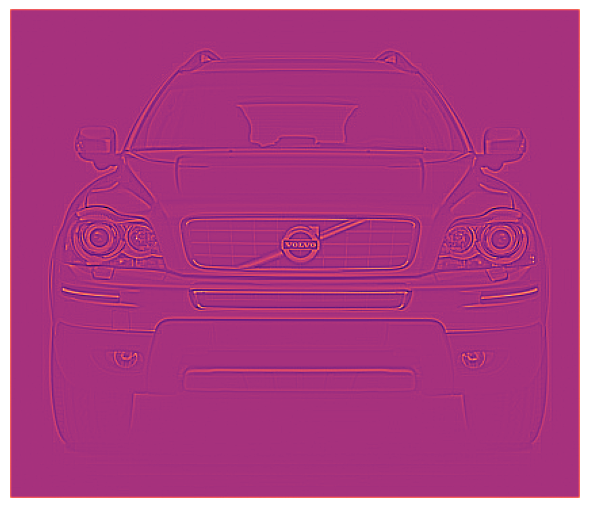
image_path = '../input/computer-vision-resources/car_feature.jpg'
#이미지를 모델에 넣고
image = tf.io.read_file(image_path)
#이미지를 디코딩함.jpg 형식의 이미지를 처리하기 위한 이미지 형식으로 변경한다는 정도로 이해된다.
image = tf.io.decode_jpeg(image)
#해당 이미지 출력
plt.figure(figsize=(6, 6))
plt.imshow(tf.squeeze(image), cmap='gray')
plt.axis('off')
plt.show();
#
For the filtering step, we'll define a kernel and then apply it with the convolution. The kernel in this case is an "edge detection" kernel. You can define it with tf.constant just like you'd define an array in Numpy with np.array. This creates a tensor of the sort TensorFlow uses.
필터링 단계에서 커널을 정의하고 적용할 것이며, 이 커널은 앞서 설명한 것과 같이 합성곱 레이어에 해당한다.
여기서는 경계선을 인지하는 커널이며 tf.constant로 정의할 수 있다. (Numpy에서 np.array로 행렬을 만드는 것과 유사. 다만 tf에서는 tf에서 다루기 위한 텐서를 만드는 것.)
#파이썬코드
import tensorflow as tf
#커널을 정의
kernel = tf.constant([
[-1, -1, -1],
[-1, 8, -1],
[-1, -1, -1],
])
plt.figure(figsize=(3, 3))
show_kernel(kernel)

중략
#파이썬코드
#아래코드는 batch compatibility로 사용하려는 데이터셋을 tf에 사용하기 적합한 형태로 변환하는 과정이다.
image = tf.image.convert_image_dtype(image, dtype=tf.float32)
image = tf.expand_dims(image, axis=0)
kernel = tf.reshape(kernel, [*kernel.shape, 1, 1])
kernel = tf.cast(kernel, dtype=tf.float32)
#파이썬코드
#tf 밑에 뉴럴 네트워크를 다루는 라이브러리 밑에 conv2d라는 함수를 사용하겠다는 의미다.
image_filter = tf.nn.conv2d(
input=image,
filters=kernel,
# we'll talk about these two in lesson 4!
strides=1,
padding='SAME',
)
plt.figure(figsize=(6, 6))
plt.imshow(tf.squeeze(image_filter))
plt.axis('off')
plt.show();
Next is the detection step with the ReLU function. This function is much simpler than the convolution, as it doesn't have any parameters to set.
다음은 ReLU 함수를 사용해보자. 이것은 Conv 보다 간단하다.
#파이썬코드
image_detect = tf.nn.relu(image_filter)
plt.figure(figsize=(6, 6))
plt.imshow(tf.squeeze(image_detect))
plt.axis('off')
plt.show();

And now we've created a feature map! Images like these are what the head uses to solve its classification problem. We can imagine that certain features might be more characteristic of Cars and others more characteristic of Trucks. The task of a convnet during training is to create kernels that can find those features.
자 이제 우리는 피쳐맵을 생성했고 이렇게 적용된 이미지들을 모아서 헤드가 분류 문제를 해결하게 된다. (앞서 베이스와 헤드의 역할 설명했던것)
우리는 어떤 피쳐가 승용차와 트럭을 나타내는 특징이 되는지 상상해볼 수 있다. 컨브이넷은 트레이닝 하는 과정에서 커널을 만들고 그런 종류의 피쳐들을 선별해낸다.
Conclusion
We saw in this lesson the first two steps a convnet uses to perform feature extraction: filter with Conv2D layers and detect with relu activation.
여기서 우리는 컨브이넷이 이미지 인식을 위한 피쳐 추출을 할때 적용되는 첫 2가지 스텝에 대해서 공부했다.
'로봇-AI' 카테고리의 다른 글
| [딥러닝초급]Data Augmentation (0) | 2025.03.07 |
|---|---|
| [딥러닝초급]Maximum Pooling (0) | 2025.02.28 |
| [딥러닝초급]the convolutional classifier (0) | 2025.02.24 |
| [딥러닝기초]Binary Classification (0) | 2025.02.19 |
| [딥러닝초급] Drop out and Batch Normalization (0) | 2025.02.18 |


